
Transport yourself over to Barbarella's Shagpile Cockpit to see how the new CD soundtrack compares to the original 2002 release...

 This beautiful artwork was used across Europe and America. The artist is Robert McGinnis, whose most famous posters were for several James Bond movies from Sean Connery's era, as well as Live and Let Die and The Man with the Golden Gun (thanks to IMP for that info). The long, wide version (at top) was a spectacular 20 feet wide!
 One character isn't recognisable from the film (the one in the spacesuit, centre right), so I'm guessing this was produced for advanced publicity. Note that Durand-Durand's ship is the one shown crashing, rather than Barbarella's.
 UK 'quad', 1968
 Spain, 1968
 Mexican over-sized lobby card, 1968
 Japan, 1968.
 A couple of Italian variations on the McGinnis artwork.
 Italy also has their own style of collage posters, called fotobustas, of which many variations are produced for each film. These are the ones I know of...


 As you can see, many of the costumes are the wrong colours and the fleshtones look strange, probably because they're black and white photos that have been coloured in.
 Czechoslovakia, 1971
 Germany, 1973
 Cult fantasy artist Boris Vallejo painted this artwork for the 1977 re-release that followed the space madness of Star Wars. Note that Pygar is wingless. This has become familiar as the art on all home video releases - on VHS, laserdisc and DVD. Note also the new, longer title (which never appeared onscreen).
 Lastly there's this spectacular art by the Hildebrandt Brothers, famous for a classic early Star Wars poster, for a 1979 re-release. Seems like a lot of re-releases, but I guess it's because there was no home video yet.
 The 'floor' of the set behind/below her includes the ship's computer, with its flipping tiles, at right.


 The walls of the cockpit are famously covered in what looks like shag pile carpet.
 The statue/communicator and the plexi-domed weapons-teleporter are among the only moving props.


 Inside the wreck of Alpha 1 are the outcast children and their killer dolls.
 Mark Hand's sailship is a full scale prop. The transparent fan at the back rises up to fill long, conical sails.
 Full-size mock-up of the exterior of Barbarella's spaceship, Alpha 7
 Back inside, Barbarella has to get rid of her tail, by using the walk-in wardrobe off the main cockpit.
 Alpha 7 crashes (again) into the Labyrinth. A full scale section of Alpha 7 is again seen as she falls down a rockslide at Pygar's feet.
 The Labyrinth set is a maze of rock corridors, many with actors built into the walls. The set leads up to a model of the city of Sogo, linked by gradually forced-perspective. Sogo appears to be a multi-levelled city on stilts, with transparent walls. Not quite sure where the Mathmos is supposed to live!
 The nest is a huge bowl of sticks (big enough for two) sat on top of one of the Labyrinth walls, filled with feathers and dried grass.
 Pygar sets down in Sogo in this asymmetrical glass corridor.
 The corridor leads onto this multi-level street, with various living quarters (or are they shops?) off to one side.
 The streets of Sogo are fairly dangerous for the blind, considering the total lack of railings. Note also the dead body bottom left.
 Two randy ruffians emerge through a tilting window and drag Barbarella into a basement filled with large transparent pillows, where she meets the One-Eyed Wench.
 We've already seen blue rabbits inside Alpha 1, but this detail from the Sogo street offers us purple goats and a huge anteater, which I haven't yet spotted in the finished film.
 This platform at the end of the street is where the mob corners Pygar. Note the transparent travel tube at right.
 The back wall of this set appears in many publicity photos.
 Pygar and Barbarella escape into a room which offers them only three exits (the entrance seals behind them with a sliding door). The floor is also transparent, with the bubbling Mathmos underneath. At top left is the raised writing which Pygar reads like braille - like the local language, the writing isn't familiar to someone from Earth.
 The Concierge then escorts Barbarella to a travel tube (below) - note his black segmented cummerbund and the leather guards' 'whip hands'.
 Down a travel tube, Barbarella meets the evil twins again, in a casino.
 The segmented backdrop to this set is re-used in several scenes around the palace. It first appears here, as the Queen appears from within a gigantic bursting balloon.
 It's here that Pygar has been crucified, hung from the ceiling on an abstract cross, back in the casino room. The brown segments, in the central cluster on the wall, look similar to the bedding in Dildano's couch, and the styling of Durand-Durand's positronic chair.

 Barbarella is taken to a huge bird-headed birdcage, to be fed to the carniverous occupants.


 Dildano's hideout is a mess of travel tubes and malfunctioning equipment. Under the segments of his bed/couch is a secret transmitter.
 Barbarella hits a nightclub. Note the rooms at the back are full of inflatable pillows and half-naked women. Also, the woman hanging from the ceiling at left, with a group on the floor lighting a fire under her!
 These backrooms provided many opportunities for publicity photos of nudity, which barely appears in the film.

 Barbarella tries 'essence of man', through a pipe hooked up to a large glass hookah with a man swimming in it (below right).
 The Concierge tortures Barbarella in his Excess Machine. Note the throne room background again and the discarded bodies lying around.

 The approach to the Queen's Chamber of Dreams is a largely black set with shiny polished floors, weird spiky sculptures and huge swinging lenses hung from the ceiling.
 Inside, huge psychedelic patterns on the walls either help the Queen sleep, or represent her dreams. The back wall is a front-projection screen.
 The Queen's bed is a sculpture of a giant open-armed female figure, the pillow is inside its hollow head.
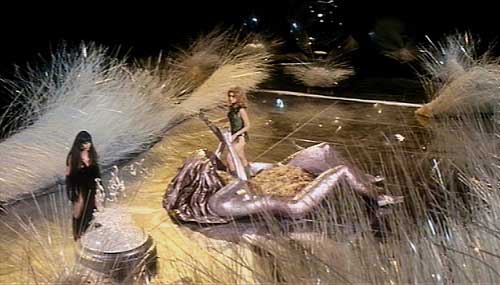 The control levers to the Mathmos are near the bed.
 The positronic ray is controlled from this cool chair!
 The final set is this rock ledge - the black backing is the front-projection screen.