This is a look at the sets, visualised for the far future, but obviously influenced by the latest fashions and materials of the late 1960s. Production Design is credited to Mario Garbuglia, though comic strip creator Jean-Claude Forest oversaw the look, adding touches from his imagined world of the Barbarella comic strips. Like the costumes, the Italian handmade props and sets are unique, imaginatively designed and beautifully made.
I'm attempting to show every set that appears in the film, in the order they appear, with a mix of publicity stills, screengrabs and lobby cards...
Alpha 7
Barbarella's spaceship is first seen as she loses her spacesuit. But initially we're seeing a section of the cockpit set which was rebuilt on its side, so that the camera could look down at Jane Fonda rolling around on a huge sheet of glass, to fake her weightlessness in space.
 The 'floor' of the set behind/below her includes the ship's computer, with its flipping tiles, at right.


 The walls of the cockpit are famously covered in what looks like shag pile carpet.
 The statue/communicator and the plexi-domed weapons-teleporter are among the only moving props.

The Icy Wasteland of Planet 16

Barbarella crashlands in the middle of an ice sheet. A large flat set covered with dry ice and fake snow. Around the edge of the set are forced perspective, transparent mountains. Scattered across the set are crashed spaceships including Alpha 1, Durand Durand's ship.
 Inside the wreck of Alpha 1 are the outcast children and their killer dolls.
 Mark Hand's sailship is a full scale prop. The transparent fan at the back rises up to fill long, conical sails.
 Full-size mock-up of the exterior of Barbarella's spaceship, Alpha 7
 Back inside, Barbarella has to get rid of her tail, by using the walk-in wardrobe off the main cockpit.
The Labyrinth
 Alpha 7 crashes (again) into the Labyrinth. A full scale section of Alpha 7 is again seen as she falls down a rockslide at Pygar's feet.
 The Labyrinth set is a maze of rock corridors, many with actors built into the walls. The set leads up to a model of the city of Sogo, linked by gradually forced-perspective. Sogo appears to be a multi-levelled city on stilts, with transparent walls. Not quite sure where the Mathmos is supposed to live!
Pygar's Nest
 The nest is a huge bowl of sticks (big enough for two) sat on top of one of the Labyrinth walls, filled with feathers and dried grass.
Sogo - City of Night
 Pygar sets down in Sogo in this asymmetrical glass corridor.
 The corridor leads onto this multi-level street, with various living quarters (or are they shops?) off to one side.
 The streets of Sogo are fairly dangerous for the blind, considering the total lack of railings. Note also the dead body bottom left.
 Two randy ruffians emerge through a tilting window and drag Barbarella into a basement filled with large transparent pillows, where she meets the One-Eyed Wench.
 We've already seen blue rabbits inside Alpha 1, but this detail from the Sogo street offers us purple goats and a huge anteater, which I haven't yet spotted in the finished film.
 This platform at the end of the street is where the mob corners Pygar. Note the transparent travel tube at right.
 The back wall of this set appears in many publicity photos.
Chamber of Ultimate Solution
 Pygar and Barbarella escape into a room which offers them only three exits (the entrance seals behind them with a sliding door). The floor is also transparent, with the bubbling Mathmos underneath. At top left is the raised writing which Pygar reads like braille - like the local language, the writing isn't familiar to someone from Earth.
 The Concierge then escorts Barbarella to a travel tube (below) - note his black segmented cummerbund and the leather guards' 'whip hands'.
Throne Room of the Black Queen
 Down a travel tube, Barbarella meets the evil twins again, in a casino.
 The segmented backdrop to this set is re-used in several scenes around the palace. It first appears here, as the Queen appears from within a gigantic bursting balloon.
 It's here that Pygar has been crucified, hung from the ceiling on an abstract cross, back in the casino room. The brown segments, in the central cluster on the wall, look similar to the bedding in Dildano's couch, and the styling of Durand-Durand's positronic chair.

"Take her to the birds"
 Barbarella is taken to a huge bird-headed birdcage, to be fed to the carniverous occupants.

Dildano's Secret Headquarters

This set looks very different in the two versions that were filmed - compare the light-up maps of Sogo at the back. This indicates that the set was rethought and rebuilt for the David Hemmings' reshoot.

 Dildano's hideout is a mess of travel tubes and malfunctioning equipment. Under the segments of his bed/couch is a secret transmitter.

The Nightclub
 Barbarella hits a nightclub. Note the rooms at the back are full of inflatable pillows and half-naked women. Also, the woman hanging from the ceiling at left, with a group on the floor lighting a fire under her!

 These backrooms provided many opportunities for publicity photos of nudity, which barely appears in the film.


 Barbarella tries 'essence of man', through a pipe hooked up to a large glass hookah with a man swimming in it (below right).

The Excess Machine
 The Concierge tortures Barbarella in his Excess Machine. Note the throne room background again and the discarded bodies lying around.


The Chamber of Dreams
 The approach to the Queen's Chamber of Dreams is a largely black set with shiny polished floors, weird spiky sculptures and huge swinging lenses hung from the ceiling.
 Inside, huge psychedelic patterns on the walls either help the Queen sleep, or represent her dreams. The back wall is a front-projection screen.
 The Queen's bed is a sculpture of a giant open-armed female figure, the pillow is inside its hollow head.
 The control levers to the Mathmos are near the bed.

The Positronic Ray
 The positronic ray is controlled from this cool chair!
On The Rocks Dildano's hideout is a mess of travel tubes and malfunctioning equipment. Under the segments of his bed/couch is a secret transmitter.
The Nightclub
Barbarella hits a nightclub. Note the rooms at the back are full of inflatable pillows and half-naked women. Also, the woman hanging from the ceiling at left, with a group on the floor lighting a fire under her!These backrooms provided many opportunities for publicity photos of nudity, which barely appears in the film. Barbarella tries 'essence of man', through a pipe hooked up to a large glass hookah with a man swimming in it (below right).
The Excess Machine
 The Concierge tortures Barbarella in his Excess Machine. Note the throne room background again and the discarded bodies lying around.

The Chamber of Dreams
 The approach to the Queen's Chamber of Dreams is a largely black set with shiny polished floors, weird spiky sculptures and huge swinging lenses hung from the ceiling.
 Inside, huge psychedelic patterns on the walls either help the Queen sleep, or represent her dreams. The back wall is a front-projection screen.
 The Queen's bed is a sculpture of a giant open-armed female figure, the pillow is inside its hollow head.
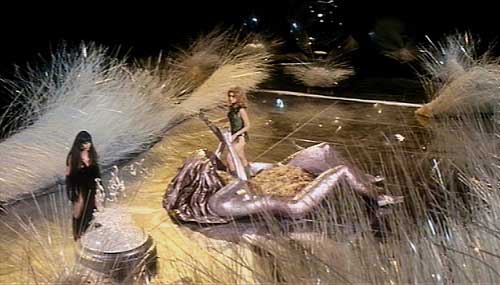 The control levers to the Mathmos are near the bed.
The Positronic Ray
 The positronic ray is controlled from this cool chair!
 The final set is this rock ledge - the black backing is the front-projection screen.
Some recurring elements in the design include the extensive use of transparent plastics (also used in costumes), segmented assembly (the Guards' costumes, the Concierge's 'Sydney Opera House' cummerbund and the throne room set), objects (lights, lenses) and people swinging slowly from the ceiling, horns (the Queen's hairstyle, the sailboat sails) and tubing. Almost all the designs use non-symmetrical patterns and structure.
Some incidental pieces of furniture are copies of body parts, particularly the Queen's bed. Phallic and breast-like motifs are of course abundant, extending even to the vehicles - like the three pulsing knobs of Alpha 7's engines. The breastlike double-cockpits of the guards' airships echo the see-through breast windows in several costumes.
Lastly, there are a few animals around - like goats and rabbits dyed bright colours. I think there's also an owl and an anteater in there somewhere!
Don't miss out on the previous chapters of The Ultimate Guide to Barbarella:
Part 1: Review and overview
Part 2: The movie's Cast and Characters
Part 3: Barbarella's many costumes
Part 4: Missing scenes from the movie
No comments:
Post a Comment